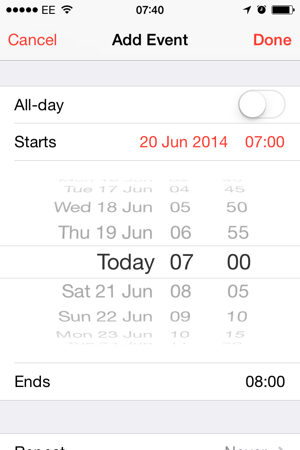
 Putting a
 UIPickerView in toggled cell in a static UITableViewController isn’t too difficult, but I found it had a few edge cases worth documenting.
In Apple’s iOS 7 apps, when using table views to hold input controls, they include picker views inline with the table view rather than replacing the keyboard with the picker, as they did in iOS6 and earlier. This works well as UI, however I found that since you don’t want to override methods like cellForRowAtIndexPath:, you need a few tricks to get the expanding and contracting working as you want.
My approach uses a picker to select countries defined in an array, which is expanded and collapsed by tapping the row above, used to display the selected country. We’ll toggle the height of the picker’s row between 0 and 216 depending on the state of the flag, stored as a property on the view controller.
First up, we need to design the table. Since we’re using a static table, just do this as normal in the storyboard - add two rows, one for the country display, which will always be visible, and one for the picker, which will be toggled between expanded and collapsed. Add a UITextField to the display row, and a UIPickerView to the picker row, and set outlets for each in your view controller. Make sure you disable the UITextField, as users will never interact with it directly. Add a UITapGestureRecognizer to the display field, and wire up an action called countryCellTapped:sender. Finally, ctrl-drag from the UIPickerView to the view controller in Xcode, and set the view controller as both datasource and delegate for the picker.
That’s all the plumbing done, now on to the code. First, we’ll need to implement the UIPickerViewDataSource protocol in our view controller class. Both of these methods are required, but very simple - the components method should return the number of wheels in the picker, i.e. 1 for our case, 3 in the image above. numberOfRowsInComponent: should reflect your model’s state at all times - if the list changes, a call to this method should be accurate. The count method is obviously useful for this.
- (NSInteger)numberOfComponentsInPickerView:(UIPickerView *)pickerView
{
    return 1;
}

- (NSInteger)pickerView:(UIPickerView *)pickerView numberOfRowsInComponent:(NSInteger)component
{
    return [self.countries count];
}
Next up are the UIPickerViewDelegate methods. None of these are formally required, but you need to include one of the titleForRow methods, or all yourentries in the list will be blank! I’m using the attributed version of the method, as I want to change the text colour - there’s no way to set this in the storyboard. Note here that my self.countries is retrieved from a webService, so I’ve opted to return nil for all titles if the webservice has not yet returned. This is really for completeness, as the method probably won’t be called when self.countries is nil, as we count that variable above to get the number of rows - if there are no rows, why would it get the title?
- (NSAttributedString *)pickerView:(UIPickerView *)pickerView attributedTitleForRow:(NSInteger)row forComponent:(NSInteger)component
{
    if (self.countries) {
        NSString *countryName = [[self.countries[row] valueForKey:@"name"] capitalizedString];
        return [[NSAttributedString alloc] initWithString:countryName
                                               attributes:@{NSForegroundColorAttributeName:[UIColor whiteColor]}];
    }
    return nil;
}
In the next delegate method, pickerView: didSelectRow: inComponent:, we update the display row. I also keep a copy of the array item, as in my case a country is defined by a little dictionary, and I want to use that later on.
- (void)pickerView:(UIPickerView *)pickerView didSelectRow:(NSInteger)row inComponent:(NSInteger)component
{
    self.selectedCountry = [self.countries[row] copy];
    self.addressCountry.text = [[self.countries[row] valueForKey:@"name"] capitalizedString];
}
Finally, we want to be able to toggle the picker’s visiblity. For the sake of this post, I’ll be doing that with the tap gesture recogniser, as my UITableViewController has selection disabled - if you were not using the other cells for UI, and so had selection turned on, you could do this in didSelectRowAtIndexPath.
Because this is a short, static table, I’m referring to the cell that contains the picker by hard-coded index path in both my setCountryPickerVisible flag method, and my heightForRowAtIndexPath method.
I set the picker itself (not the cell it’s in) to be hidden when the row is contracted - if you don’t do this, you’ll still see it over/behind your other cells.
I had to put an extra reloadData call at the end of the setCountryPickerVisible method to get around a bug in the animations - if you leave this out, the animations happen but the rows disappear afterwards, you just see through to the tableview’s background.
- (IBAction)countryCellTapped:(id)sender {
    self.countryPickerVisible = !self.countryPickerVisible;
}

#define COUNTRY_PICKER_SECTION 1
#define COUNTRY_PICKER_ROW 5
- (void)setCountryPickerVisible:(BOOL)countryPickerVisible
{
    _countryPickerVisible = countryPickerVisible;
    [self.addressCountryPicker setHidden:!countryPickerVisible];

    NSIndexPath *countryPickerIndexPath = [NSIndexPath indexPathForRow:COUNTRY_PICKER_ROW inSection:COUNTRY_PICKER_SECTION];

    [self.tableView beginUpdates];
    [self.tableView reloadRowsAtIndexPaths:@[countryPickerIndexPath]
                          withRowAnimation:UITableViewRowAnimationAutomatic];
    [self.tableView endUpdates];
    [self.tableView reloadData];
}

#define PICKERVIEW_VISIBLE_HEIGHT 216
#define PICKERVIEW_HIDDEN_HEIGHT 0
- (CGFloat)tableView:(UITableView *)tableView heightForRowAtIndexPath:(NSIndexPath *)indexPath
{
    BOOL heightOfCountryPickerRequested = indexPath.section == COUNTRY_PICKER_SECTION && indexPath.row == COUNTRY_PICKER_ROW;
    if (heightOfCountryPickerRequested) {
        return self.countryPickerVisible ? PICKERVIEW_VISIBLE_HEIGHT : PICKERVIEW_HIDDEN_HEIGHT;
    }

    return UITableViewAutomaticDimension;
}
And that’s it. I hope that’s helped someone, if it’s useful, drop me a tweet or leave a comment below.